How to successfully file a mining claim with both the county and state BLM offices
So, you have located a mining claim, put your stake in the ground, now what? The filing process to record your claim(s) can seem daunting to say the least. We have put together a step-by-step guide to successfully file a mining claim within the county and state the claim is located in.
There are four documents you will need in order to file your mining claim.
- A Location Notice for each claim (also called ‘Certificate of Location’)
- A Master Map that shows all of the claims
- A cover letter for the county, and fees
- A cover letter for the state BLM, and fees
1. The Location Notice
Remember that you will need one of these for each claim you are sending in. This is a document that has all the pertinent information for each of your claims. In accordance with most states law, a Location Notice must be filed with the county in which the claim is located in within a certain time frame after the date of the claim location in the field. This Location Notice must also be recorded within 90 days of the field location with the state BLM office.
For each county there might be slightly different needs for the location notice paperwork.
Once you have downloaded the Location Notice template, call the clerk and recorder’s office for the county your claims are located in and ask the following questions:
- What is the filing fee for each claim?
- Do you need to pay a filing fee by the claim or by the page, and if it is by the page does the cover letter count?
- What is the correct address that I should use to send my claim information to the county?
- Are there any special instructions for the Location Notice itself? Such as margins, or paper size.
The margin at the top of the sheet is very important. Some counties will have specific requirements for the width of the top margin between “For Bureau of Land Management Use” and “1. Name of Claim” This space is used for their received stamp and will need to be adjusted if needed. The penalty for not meeting the county requirements can be that they charge you a fee for an extra page for each claim, or they might return it to you to correct before they can process it.
How to Fill out the information for the Location Notice:
- Name of Claim: This needs to be the same name of the claim that was used during the staking process.
- Type Of Claim: The BLM describes each type of claims in detail here
- Date of Location: This is the date that the claim was staked. It is very important that this date matches the date on paperwork located on the stake in the ground, in the field.
- This Claim is Located in: This is the standard information for the location of the claim. It is crucial that the Township, Range, Section and Quarter Section, is filled out for all Quarter Sections that the claim intersects.
To properly fill out this data you will need The Public Land Survey System (PLSS) Data. This will also help out with the task of making a Master Map as up will need this data for that task. You can use QGIS (Open Source GIS) Or Google Earth for this process as well as the Master Map step.
For QGIS, software available for Windows, Mac, and Linux users. To download, visit https://www.qgis.org/en/site/forusers/download.html
To open any data product in QGIS, open the software, and navigate to:
- -Layers → add → raster (for TIFFs and other imagery, and Digital Elevation and Digital Surface Models)
- -Layers → add → vector (for Contour lines, Roads, Rivers, and Ground Control Point data)
- -Layers → add → WMS/WMTS ( you can use the data linked to below for Google Earth, you will need to choose WMS at the top of the page instead of Google Earth)
- You will need to download or load in the WMS layer from you appropriate state.
For Google Earth follow the instructions provided by the BLM here https://navigator.blm.gov/api/resources/guides/BLM-MapServiceGoogleEarthInteraction.pdf
- The boundaries are located: This information describes how the boundaries of the claim is laid out. Typically there are only four sides to the claim, but if there are more you will need to add more information than what is in the suggested template. There should be a “Thence” for each side of the claim. It is important that this starts at the corner of what was staked as the corner monument for each claim. For larger claim blocks, consider always using the same corner of the claims corner posts for you corner monument.
- Posted Discovery Monument: This is a known or constructed monument that is close to the claim. Typically, you can use the corner of a PLSS Section. Measure the distance and the direction (azimuth) from the discovery monument to the corner monument of the claim and recorded it. You will also need to record the latitude and longitude for the discovery monument. Also you will need to describe what you are using as a discovery monument.
- Adjoining Claims/sites are: Here you will add the claim names of any of your claims that are boarding the claim that is being recorded by this location notice.
- Claimant Name : This is where the claimant name and address is recorded.
- Affidavit of locator: You will need to get this Location Notice notarized. Do not sign this before you meet up with you Notary or you will have to recreate this document all over again. You can almost always find a Notary at you local bank. NOT REQUIRED IN NEVADA!
2. The Master Map
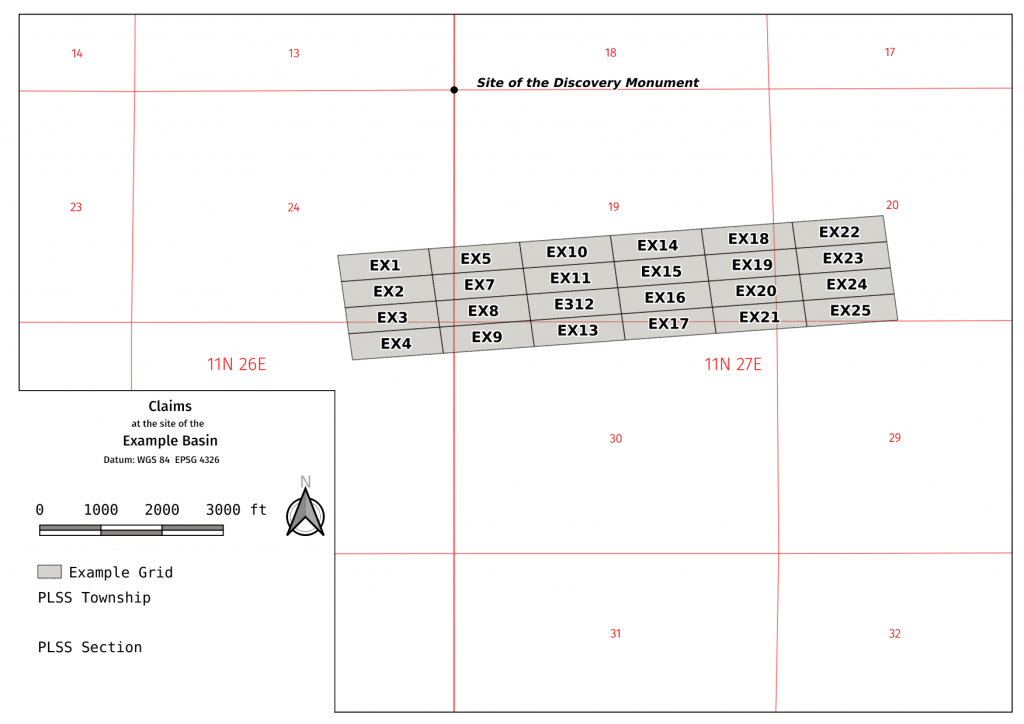
The Master Map shows all of your claims at a sufficient scale to identify the claims as well as how they are located next to other features and data sets. There are four features that any Master Map must have, and a few others that are nice to add for the completeness of a map. The must haves are as follows:
- Claim block / Claim Grid – each block needs to be labeled
- PLSS Section – each section needs to be labeled
- PLSS Township – each township needs to be labeled
- Discovery Monument – needs to be labeled
To make the map you are creating a little more professional you might think of adding one or more of the following: Contours, Base map (Shaded Relief or Satellite), Rivers, or Roads. Feel free to add any layers to your map that will help with the location of you claims. Your map should also includes a north arrow as well as a scale bar. This gives you the ability to know the basic direction your claims are laid out as well as identifying a sufficient scale for mapped area.
Example of a Master Map
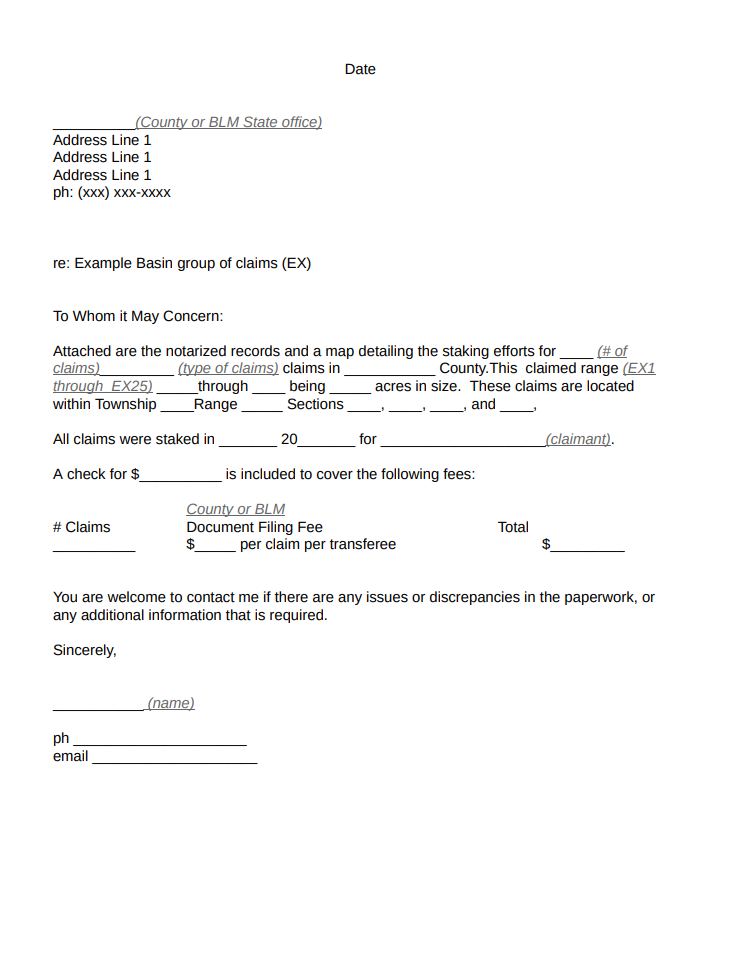
3. County Cover Letter
Use the information you gathered from your phone call to the county to fill in the cover letter template. You will need to know the filing fee for each claim and if the fee is per claim or per page in order to pay the correct amount to the county. Use the information from the Location Notice to fill out the rest of the information on the template. Make sure you have the correct address for the county clerk & recorder and include the following items in the mail packet:
- Cover letter
- Completed and notarized Location Notice
- Check made out to appropriate county for the correct amount
- Self addressed and stamped envelope to receive Location Notice’s back once they have been recorded and stamped by the county
3. BLM Cover Letter
When you receive the location notices back from the county and before mailing your claim package to the BLM, it is suggested that you call the BLM State office and ask the following questions:
- What is the filing fee for each claim? (This can change yearly, so make sure you have the right amount)
- What is the correct address that I should use to send my claim information to BLM?
Alternatively, you can find this information on the BLM website here and navigating to the state your claims are located in for the address. You can find the current BLM fees associated with filing a location notice here.
Use the same cover letter template you used for the county, taking care to change the recipient and address fields as well as the appropriate filing fees for the BLM. Include the following items in your packet:
- Cover Letter
- Original Copy of Location Notice you received back from the county with their stamp
- Check made out to the state BLM for the correct amount
BLM fees as of July 2019
- For new lode claims or mill or tunnel sites, you must pay a $212 per claim/site fee at the time of recordation with the BLM. This fee covers a $20 processing fee, a $37 location fee, and a $155 maintenance fee for the assessment year in which the claim/site was located.
- For placer claims, you must pay a $155 maintenance fee payment for every 20 acres, or portion thereof, in addition to the processing fee and location fee. For example, a 60-acre claim (3 locators) would cost $522; a 70-acre claim (4 locators) would cost $677. Be sure to check the master title plats for lots. The size of the lot will affect your initial fees and maintenance fee payment.
- The assessment year begins on September 1. For any new claims located prior to September 1, of the current assessment year, but filed with the BLM on or after September 1, you must file your waiver certification with the location notice. If you do not qualify for a waiver, you must also pay the required current maintenance fees.
Example Cover Letter
In Summary….
It may take a few months to get through the process of filing with both the county as well as the State BLM office. The process is complete when you receive your original claim package back from the BLM, which will contain the following information:
- A receipt of your payment to the BLM that will contain the cost for each claim, as well as a total of payment received.
- A listing of each MC serial number associated to the correct claim
- All original Location Notice’s with both the county stamp on it as well as the BLM received stamp on it.
It is important to also realize that the BLM stamp also contains the MC number for each claim. This is the unique identifier for your claim that is used to track payments and such through the LR2000 database . The LR2000 database allows reports to be created regarding BLM’s land and mineral use authorizations and unpatented mining claims within the United States. From these reports you can find out information regarding activities from permits and leases, licenses and other authorizations. This tool is a great resource to make sure all your information for your claim package has been recorded correctly, as well as a great tool to manage all your claims under the same claimant.
In summary, you will need a completed notarized Location Notice for each claim, a Master Map with all you claims laid out on it, and two cover letters (one for the BLM and one for the county). With this information and a few phone calls to your local State BLM office and County you will be well on your way to successfully filing a mining claim. Now the work begins….